Picking a shed size feels like it should be simple. It isn’t. Go too small and you’ll be shuffling bikes around every time you need the mower. Go too big and you’ve wasted money and yard space on square footage you’ll never use.
The good news: sizing a shed correctly isn’t guesswork. It comes down to a handful of practical questions — what you’re storing, how you’ll move around inside, how you’ll get equipment through the door, and how much room you want to leave for the stuff you haven’t bought yet.
Let’s work through it.
Start With What You're Storing
Before you look at a single size chart, make a real list of what’s going in the shed. Not a vague guess — an actual inventory. Most backyard sheds end up holding some combination of:
- Lawn mower (push or riding — a big difference in footprint)
- String trimmer, edger, and other yard tools
- Bikes (which eat up more floor space than people expect)
- Garden tools — rakes, shovels, hoses, wheelbarrows
- Outdoor furniture — cushions, folding chairs, umbrellas, seasonal cover-ups
- Snow equipment — snow blower, shovels, ice melt, sleds
- Workshop equipment — a workbench, tool chest, power tools, or a pegboard setup
Write it down category by category. This list is the foundation for everything else in this article — every size recommendation below only makes sense once you know what’s actually competing for space.
Common Shed Sizes (And What They're Actually Good For)
Shed dimensions on a spec sheet don’t tell you much on their own. Here’s what each common size realistically supports.
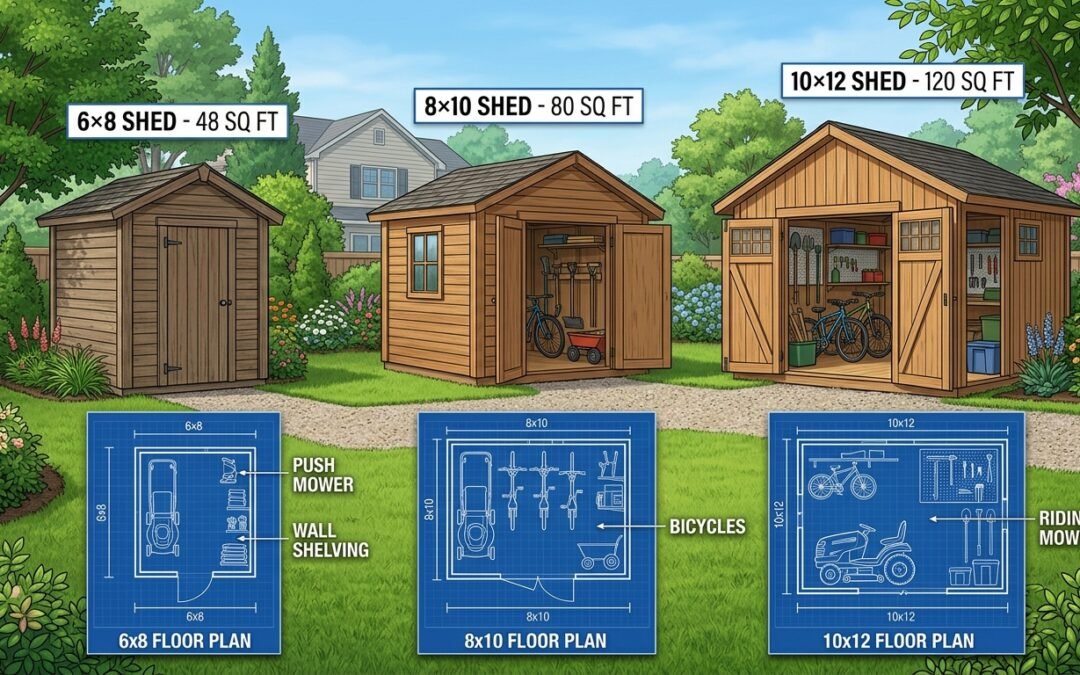
6×8 (48 sq ft)
This is entry-level storage. It’ll comfortably hold a push mower, a string trimmer, and a decent collection of garden tools hung on the wall. It is not enough space for bikes, a riding mower, or any kind of workbench. Think of a 6×8 as a “yard tools only” shed.
8×10 (80 sq ft)
The most popular all-purpose size, and for good reason. An 8×10 can hold a push mower, garden tools, a couple of bikes, and some outdoor furniture or seasonal storage — as long as you use wall space wisely (more on that below). It’s tight if you want a riding mower or a real workbench, but it’s a solid fit for the average suburban yard.
10×12 (120 sq ft)
This is where a shed starts to feel like a small garage. A 10×12 comfortably fits a riding mower or a push mower plus bikes, garden tools, outdoor furniture, and snow equipment, with room to actually walk around. If you want one shed to do it all — lawn care, bikes, and seasonal gear — this is usually the sweet spot.
12×16 (192 sq ft)
Once you’re at 12×16, you’re not just storing things — you’re using the shed. This size supports a riding mower, full workshop equipment, a workbench, and general storage all at once. It’s the go-to size for anyone who wants a dedicated workshop zone in addition to storage.
The pattern here matters more than the exact numbers: every step up in size doesn’t just add storage, it adds the ability to move and work inside the shed — which brings us to the next point.
Don't Forget Working Space
Here’s the mistake almost everyone makes: they size their shed around what will fit, not what will be usable.
Yes, you can technically cram a mower, a trimmer, a wheelbarrow, and three bikes into a 6×8 shed. But can you actually get the mower out without moving four other things first? Can you open a bike’s kickstand without hitting the wall? Can you bend down to grab a hand tool off the floor?
A good rule of thumb: subtract 20–25% of your shed’s floor space for movement and access before deciding what will “fit.” If you need to store a riding mower, you also need enough clearance to drive or roll it in and out in a straight line, not just a footprint equal to the mower itself.
Storage that you can’t comfortably access isn’t really storage — it’s just a more organized way of being frustrated.
Think About Doors and Access
This is the detail most people skip until moving day, and then regret.
Width matters more than you’d think. A standard shed door is often 36 inches wide. That’s fine for a push mower, bikes, and hand tools — but it’s a problem for a riding mower, a snow blower, or a wide workbench. If you’re storing anything with real width, look for sheds with a double door (often 5–6 feet wide combined) or a dedicated wide-access option.
Placement matters too. A door centered on the short wall of a shed works differently than one on the long wall. If you’re storing a riding mower, a door on the long wall often gives you a straighter, easier path in and out — no three-point turns required.
Do the math before you buy. Measure the widest point of your largest item (handlebars on a mower, the widest point of a snow blower) and compare it directly to the door’s clear opening width — not the shed’s nominal size. This is the single easiest way to avoid buying a shed that your own equipment can’t get into.
Think About Shelving and Vertical Storage
Floor space is only part of the equation. Wall space is often the most underused part of a shed.
Adding shelving, pegboards, or wall-mounted hooks can dramatically increase what a given footprint can hold, without adding a single square foot to the building. A few examples:
- Pegboards for hand tools free up entire shelves and drawers
- Overhead shelving is perfect for seasonal items like snow equipment or furniture cushions — things you don’t need daily
- Wall hooks can get bikes and ladders off the floor entirely, which is often the single biggest floor-space win available
- Vertical tool racks keep rakes, shovels, and trimmers organized instead of leaning in a pile
A well-shelved 8×10 can often out-perform a poorly organized 10×12. Before you size up just for more storage, ask whether better use of the walls solves the problem instead.
Leave Room for the Future
This is the point people get wrong most often, so it’s worth sitting with for a second: don’t design your shed solely around what you own today.
Think about it — most people’s outdoor gear collection only grows. You buy a house, and within a few years you’ve added a snow blower, a second bike, a grill, patio furniture, or a workshop hobby you didn’t have when you moved in. If you size your shed exactly to your current inventory, you’ll likely outgrow it in a few years.
A good approach: take your current inventory, then add a realistic “future” category — the mower upgrade you’re planning, the bikes your kids will eventually have, the workshop corner you keep meaning to set up. Sizing up now is almost always cheaper and less disruptive than building a second shed or replacing one later.
Check Your Available Yard Space
The biggest shed you can afford isn’t necessarily the biggest shed you can build. Before you settle on a size, walk your yard and check a few practical realities:
- Access to the site. Can materials, or a pre-built shed, actually get to the spot you have in mind? A shed that fits your yard on paper is useless if it can’t physically get there.
- Setback requirements. Most municipalities require a shed to sit a minimum distance from property lines, fences, and sometimes your house. These vary by town, so check before you fall in love with a size.
- Drainage. Low spots that collect water are a bad foundation location no matter how appealing the shed size is. Consider grading, gravel pads, or where runoff naturally flows.
- Permit requirements. Many areas require a permit above a certain square footage (often somewhere around 100–200 sq ft, but this varies widely). A 10×12 or 12×16 shed may cross a threshold that a 6×8 doesn’t.
It’s worth confirming these details with your local building department before you commit to a size — it can change which of the sizes above are even realistic options for your property.
Use Our Free Checklist
If you’ve made it this far, you’ve already got a good head start: what you’re storing, roughly what size makes sense, and what to check in your yard before you build.
But there are still a handful of decisions — foundation type, orientation, ventilation, and a few permit details — that are easy to overlook until they cause a problem mid-project.
Not sure what you need before you start building?
Download the free Backyard Shed Planning Checklist and work through the 10 things you should figure out before buying your first board.
What's Next
Once you’ve figured out the size and basic requirements for your shed, the next step is finding a plan that actually matches your project — one that accounts for the size you’ve settled on, the door width you need, and the layout that fits how you’ll actually use the space.
That’s exactly what we’ll dig into next.
In the meantime, you can find some inspiration in our shed ideas section.
It may also be a good time to start thinking about what your new shed will actually cost to build. You can check out our article on breaking down the costs here.